Affiliate addon
What is affiliate marketing:
Affiliate marketing is a method of earning money by promoting a company’s products or services for sales purposes. An affiliator can earn commissions every time by selling the company’s products or services. It sounds like a commission-only sales representative.
In Academy LMS, an affiliator can apply for affiliate marketing. You can manage the affiliate users. The affiliators can generate links for promoting courses. If any student purchases the courses through that links, the affiliator will get a commission. They can overview their revenue history, and they can make requests for their revenue withdrawal. Only site admin can grant their requests and pay their commissions through the online payments gateways.
How affiliation addon works in Academy LMS
You can follow the steps to know how the affiliation method works on Academy LMS.
- Install the “Academy LMS affiliate addon” on your application. (Admin site)
- Configure the affiliation settings. (Admin site)
- A user can request to become an affiliator. (User site)
- The site admin can approve or delete a user’s request to become an affiliator. (Admin site)
- An affiliator can generate and share links for the course affiliate marketing after becoming an affiliator. (User site)
- A student can purchase the courses through the shared links from the affiliators. (User site)
- If a student purchases a course through the link the revenue will share based on the commission percentage.
- The admin can overview every affiliator’s earning activities in the “Affiliation history” option. (Admin site)
- The affiliators can see their total affiliate earnings, current balance, withdrawal option, and export CVS/PDF. (User site)
- The affiliator can withdraw their earnings. For this, they have to request the site admin. The affiliator can request at a time. (User site)
- The site admin can approve or deny the withdrawal request. If the site admin approves the request, he/she can provide the revenue through the online payment gateways. (Admin site)
- The affiliator can see their all withdrawal activities in the “Withdrawal history” with every detail. (User site)
- The site admin can see the affiliation history of every affiliators. (Admin)
- The site admin and the affiliators will get confirmation emails after any activities.
How to install an addon in Academy LMS:
By installing the Academy LMS affiliate addon, you can manage the affilators easily. Also, your application will generate unique links for each affiliators to affiliate a course. It helps to increase your application’s course selling and engage more students.
To get the advantage of the affiliate marketing method, you have to install this addon on your application. For this, you have to navigate the simple steps below:
- Before installing the process, we highly recommend you check your application version. For this, you have to navigate to the “About” section from the “Settings” menu.
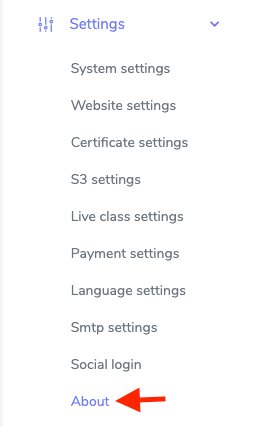
- If you are running the mentioned version, then you are ready to install this addon.
- Download the addon you want to install on your application from Codecanyon.
- Unzip the downloaded file.
- You will get two folders inside the file. One for documentation and the other for the addon folder.
- Do not try to remove or rename any folder.
- Go back to the application and log in as an admin.
- Select the “Addon” option from the left menu.
- Click on the “Install addon.”
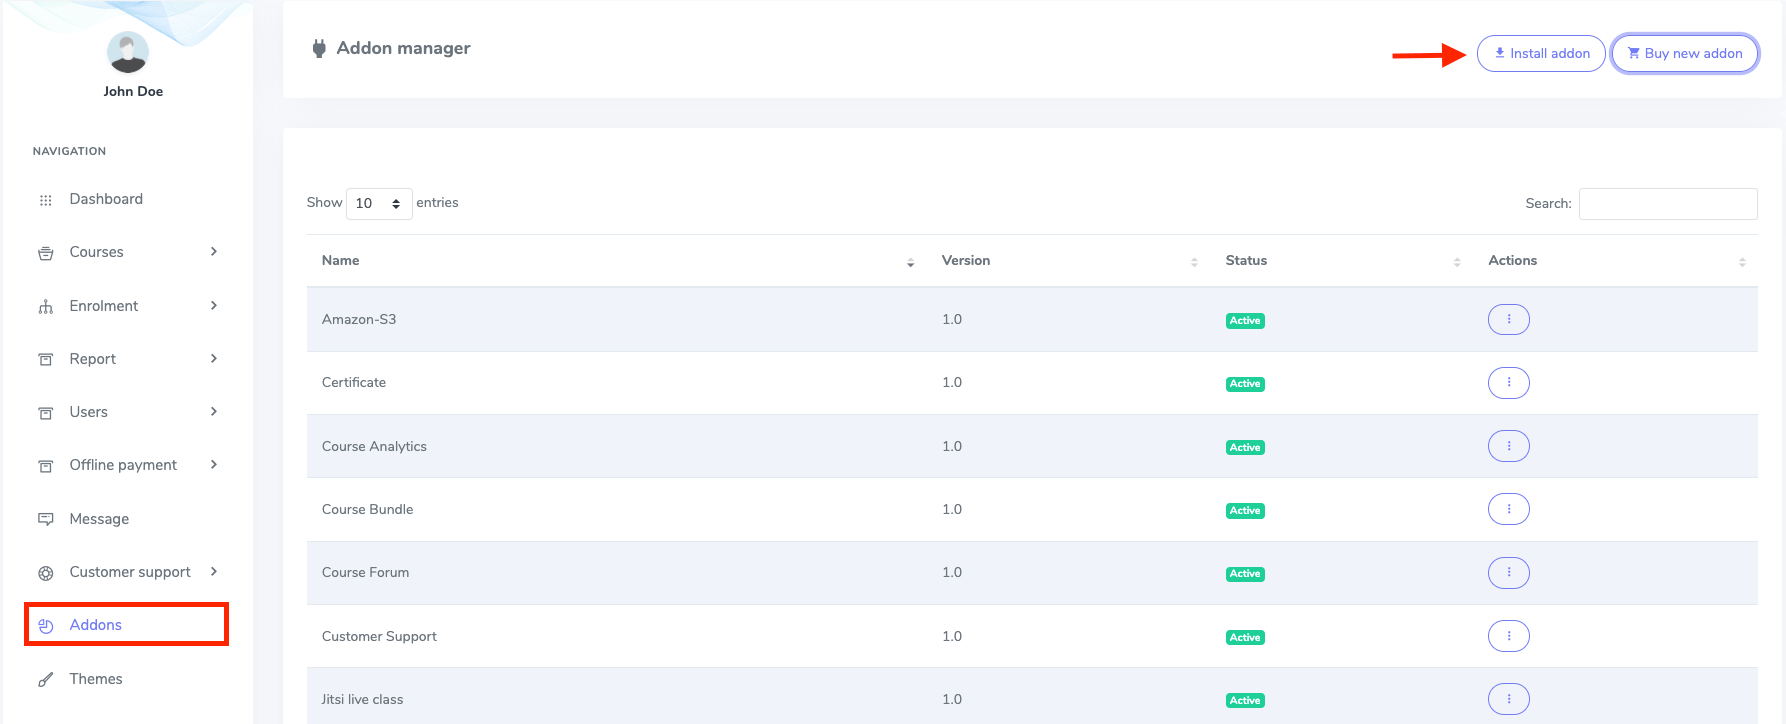
- Provide the purchase code.
- Upload the zip file from your device.
- Click on the “Install addon” button.
- You will get a success message notification.
How the site admin manages the Academy LMS Affiliate Addon:
An admin can manually add, suspend, or approve an affiliator in Academy LMS. Every user in the application can apply for becoming an affiliator if the admin allows the public affiliation. If the admin disallows the public affiliation, Then only the admin can appoint an affiliator from the existing users or create a new user as well as an affiliator in Academy LMS. The admin can overview affilators commissions history, export CSV/PDF files, approve pending payments, see complete payouts, and set affiliate commission percentage.
How to manage an affiliator:
If a user request for becoming an affiliator(Only when public affiliation is allowed by the admin), the admin can approve or decline their request. If the request gets approved by the admin the user becomes an active affilator. Then the admin can also suspend or remove an affiliator from the affliation system.
To approve a pending affiliator, the admin can follow the steps below:
- Log in to the application as an admin.
- Select the “Affiliate” option from the left menu.
- Click on the “Affiliator list” option from the sub-menu.
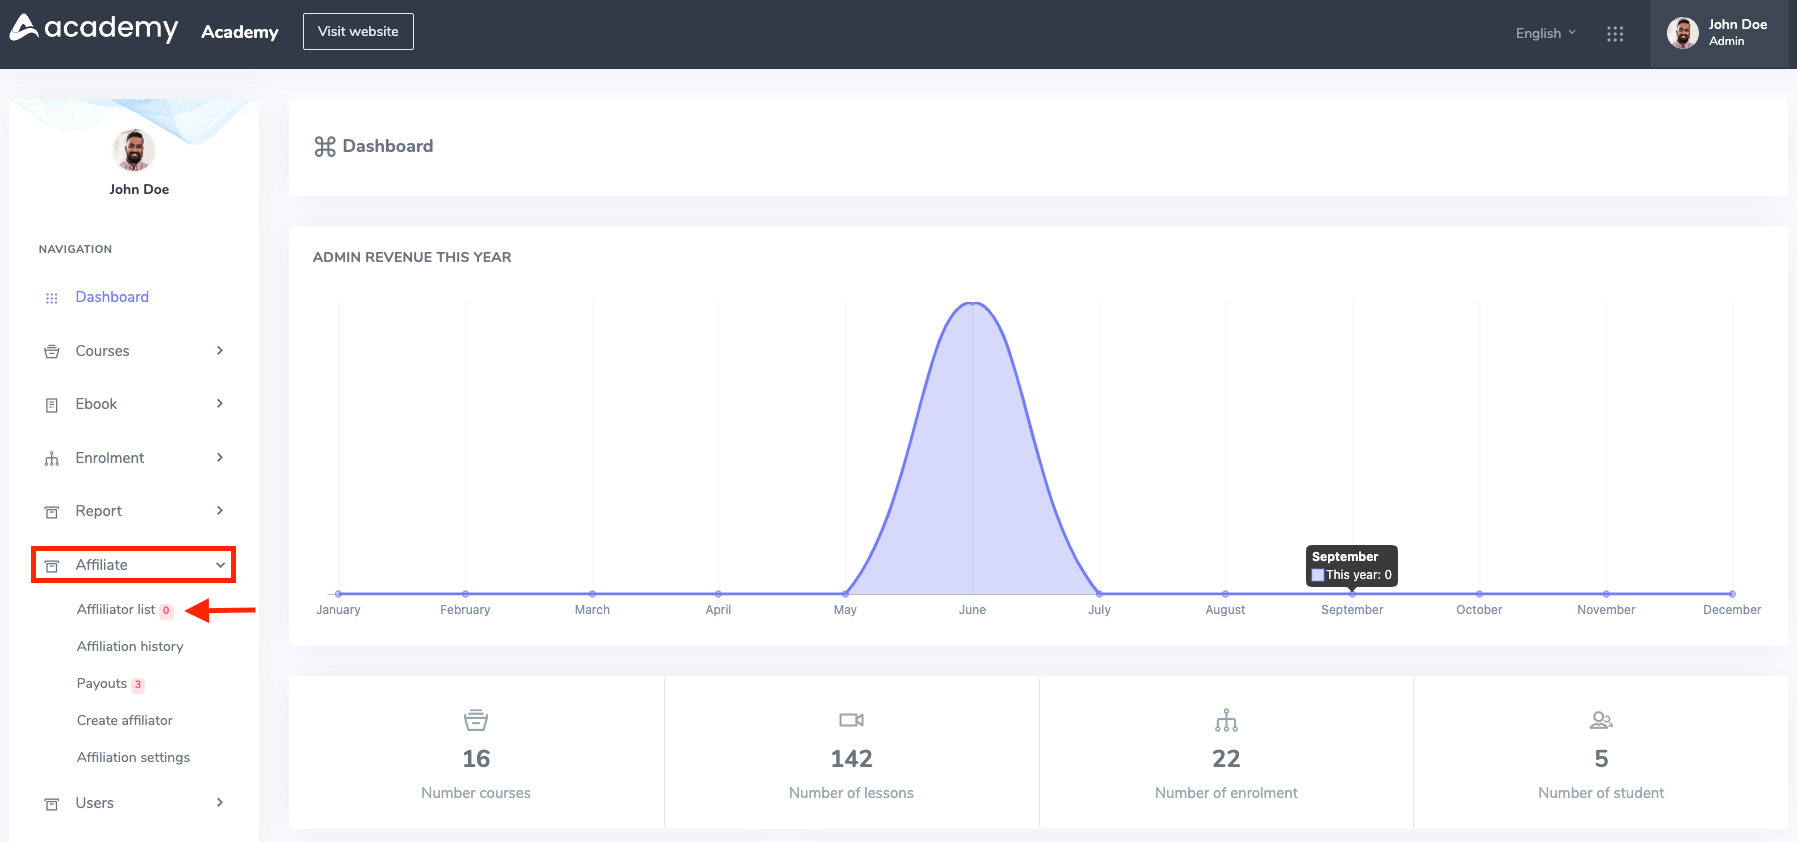
- Click on the “Pending affiliator” button.
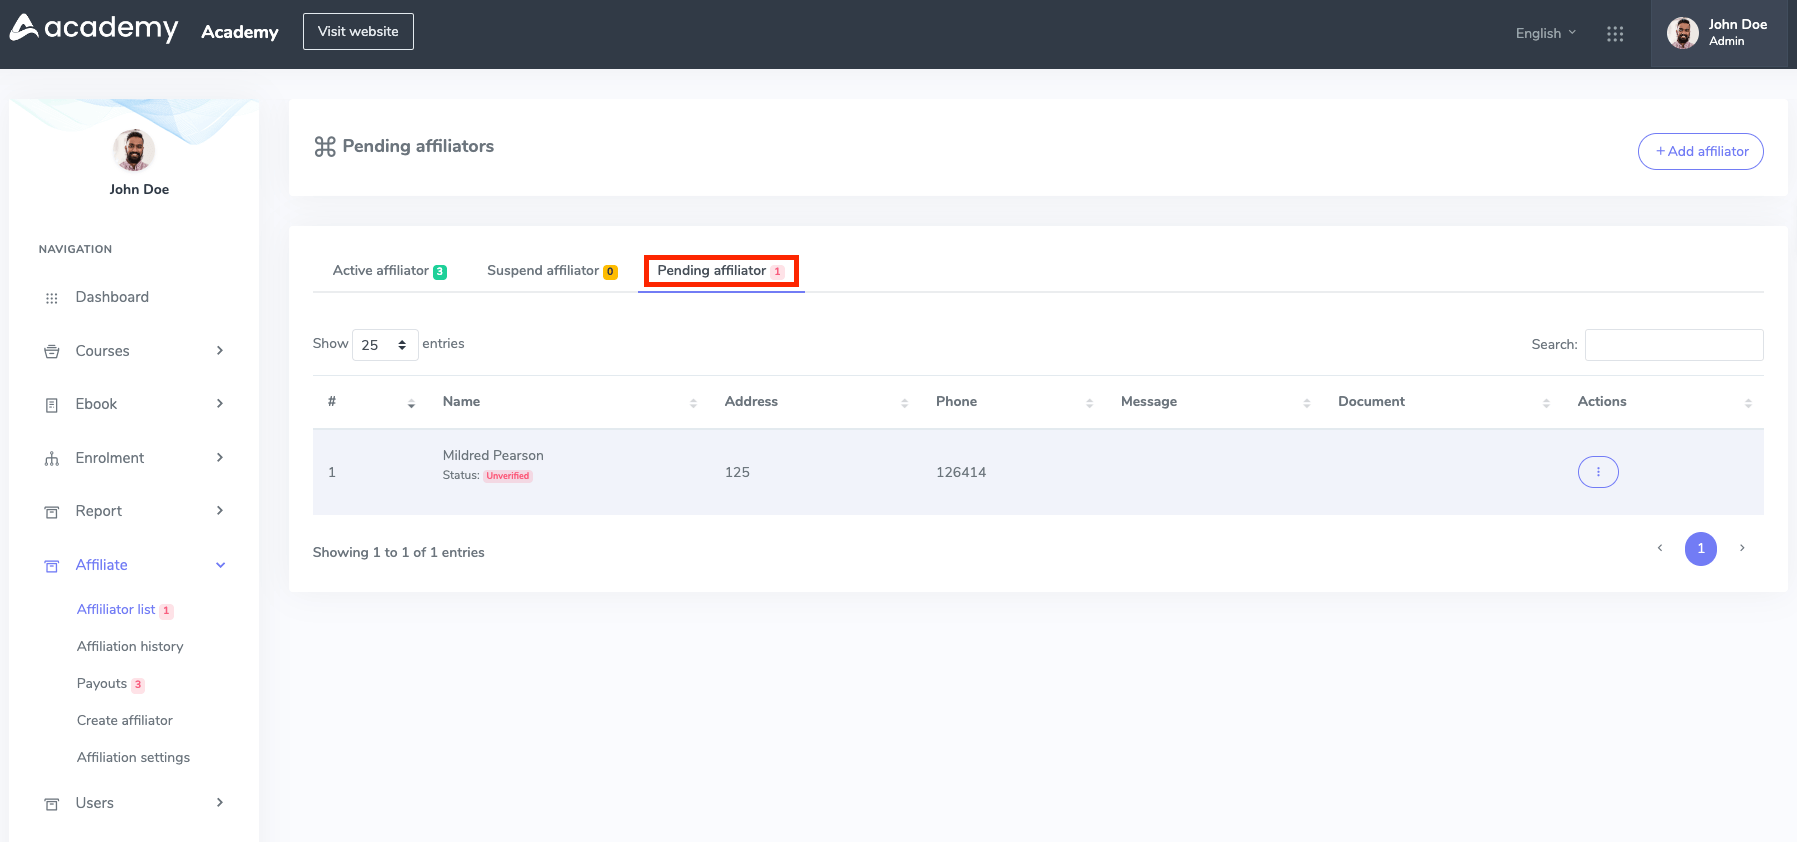
- Select an affiliator from the pending list.
- Click on the “Actions” button.

- Select the “Approve” button to accept the request or select the “Delete” button to remove the request from the application.

To suspend an affiliator, the admin can follow the steps below:
- Log in to the application as an admin.
- Select the “Affiliate” option from the left menu.
- Click on the “Affiliator list” option from the sub-menu.

- Click on the “Active affiliator” button.
- Select an affiliator from the active list.
- Click on the “Actions” button.
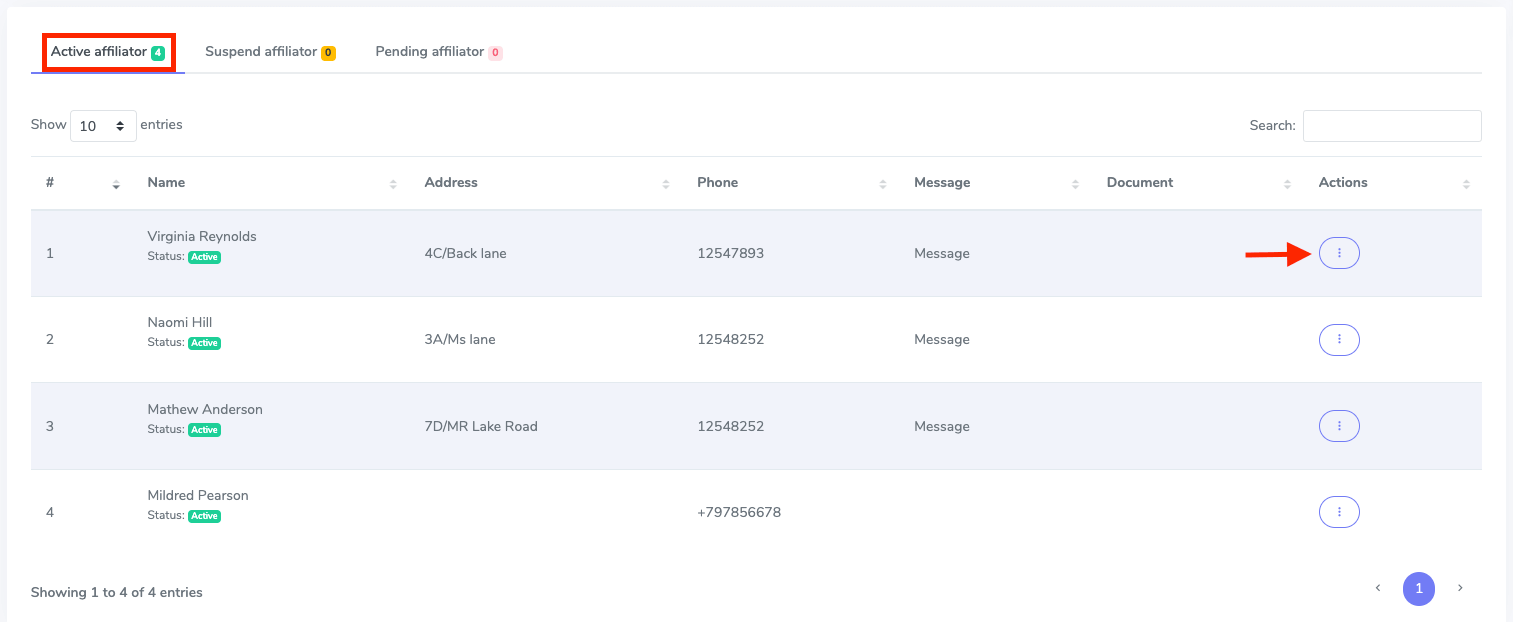
- Select the “suspend” button to pending an affiliator or select the “Delete” button to remove an affiliator from the application.
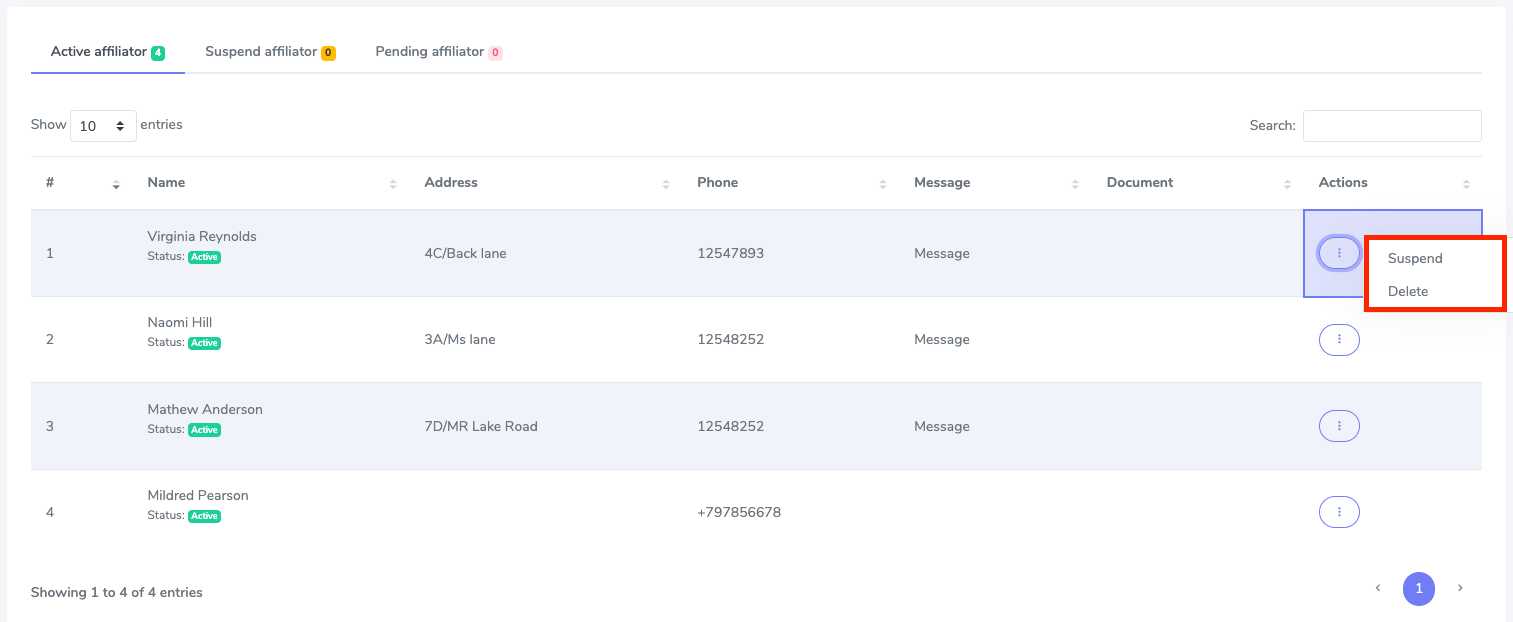
You can also active a user from the suspended list as an admin. For this, you can follow the steps below.
- Log in to the application as an admin.
- Select the “Affiliate” option from the left menu.
- Click on the “Affiliator list” option from the sub-menu.

- Click on the “Suspend affiliator” button.
- Select an affiliator from the suspended list.
- Click on the “Actions” button.

- Select the “Active” button to active an affiliator or select the “Delete” button to remove an affiliator from the application.

What is the Affiliation history:
The admin can overview the affiliation history with the custom date filtering feature easily. Also, you can search the history based on your existing affiliator. In this history option, and admin can see every affiliators details. An admin can also export their history as CVS and PDF files. The affiliators will get a confirmation email for completing the actions.
To preview affiliators history, you can follow the steps below:
- Log in to the application as an admin.
- Select the “Affiliate” option from the left menu.
- Click on the “Affiliation history” option from the sub-menu.
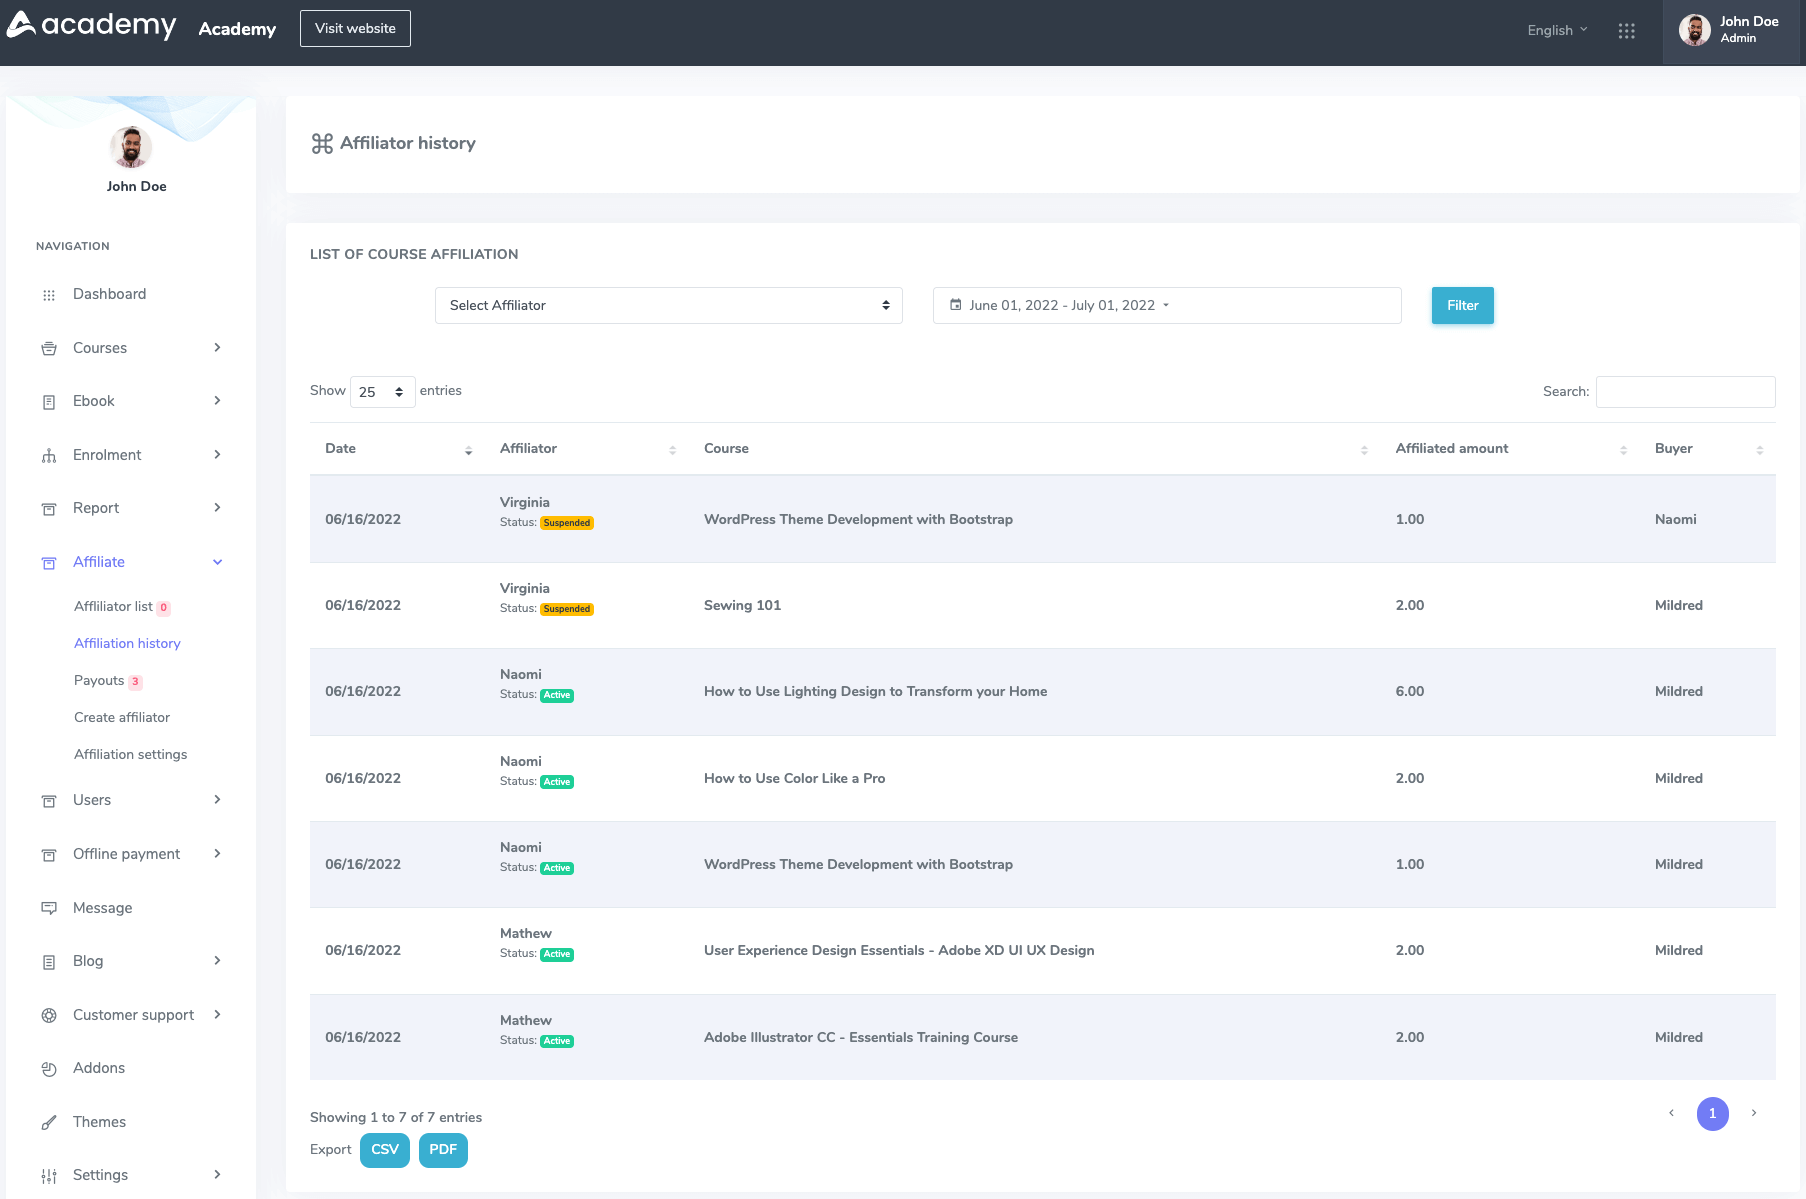
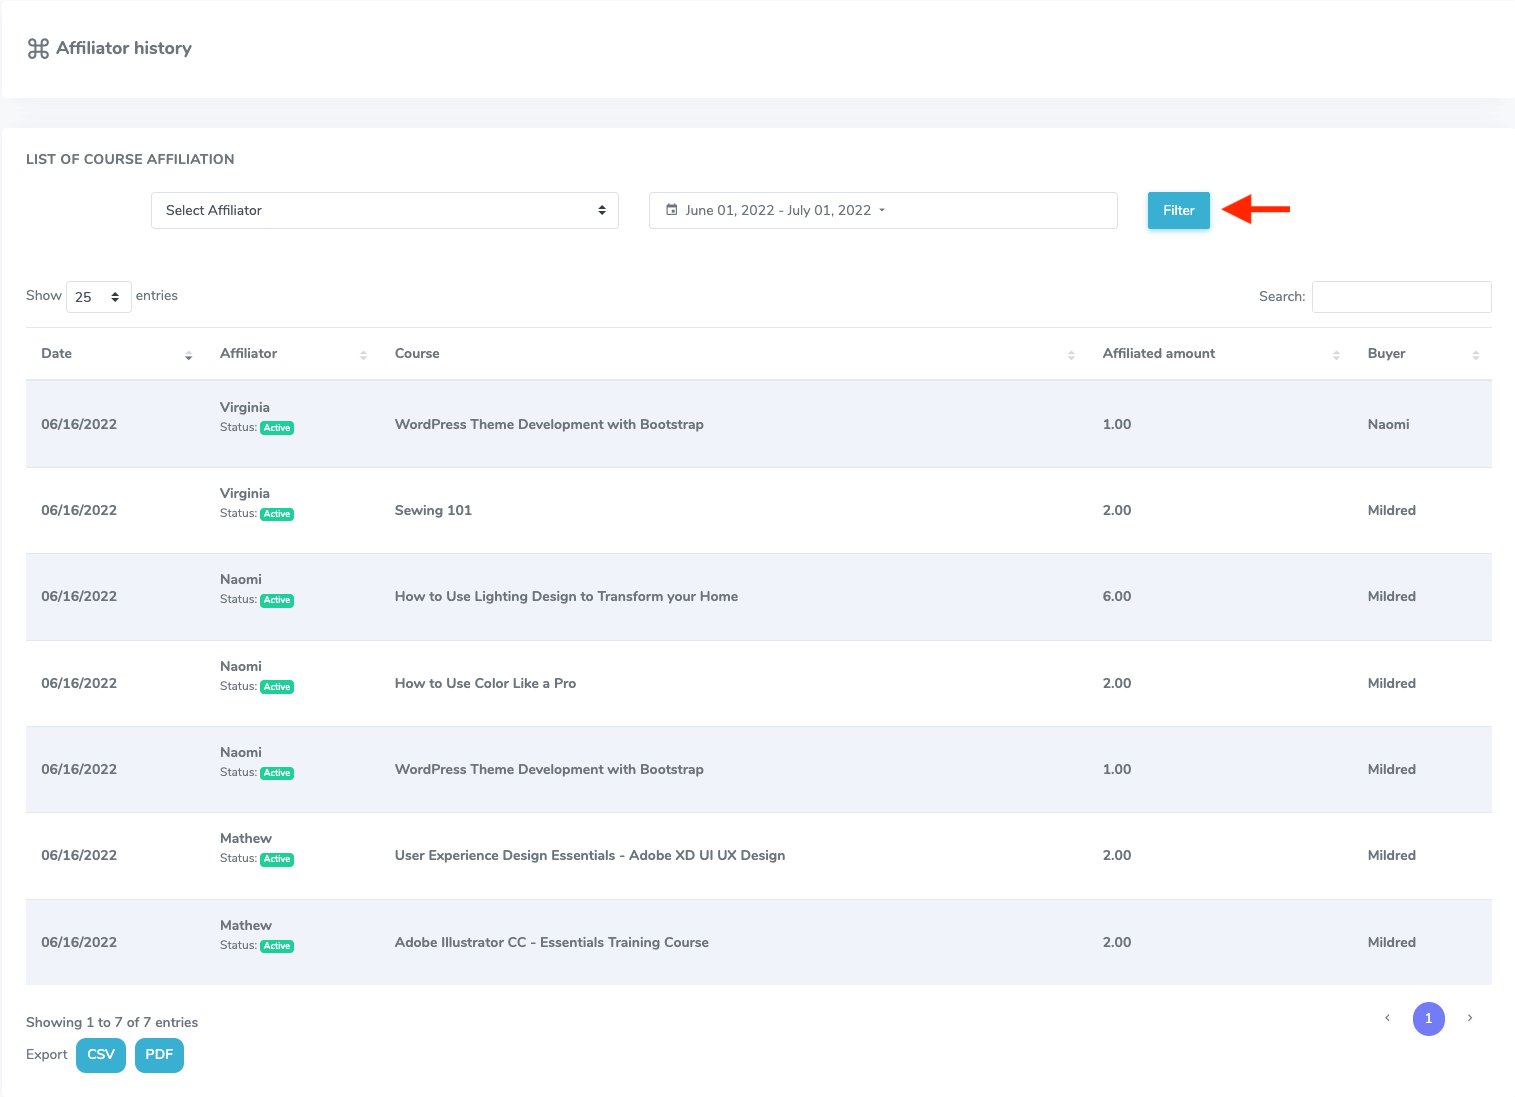
- Set your history date. (You can customize the date and existing affiliator based on your search)
- Click on the filter button.
How admin manages Payouts:
The admin approves the pending payouts if any affiliator requests withdrawal. The admin can provide the payouts through the installed online payment gateways in the application.
You can follow the steps as an admin to approve a pending payout.
- Log in to the application as an admin.
- Select the “Affiliate” option from the left menu.
- Click on the “Payouts” option from the sub-menu.
- Choose the “Pending payouts” option.
- Select a pending payout from the list.
- Choose a suitable online payment gateway.
- Provide required information and complete the pending payout.
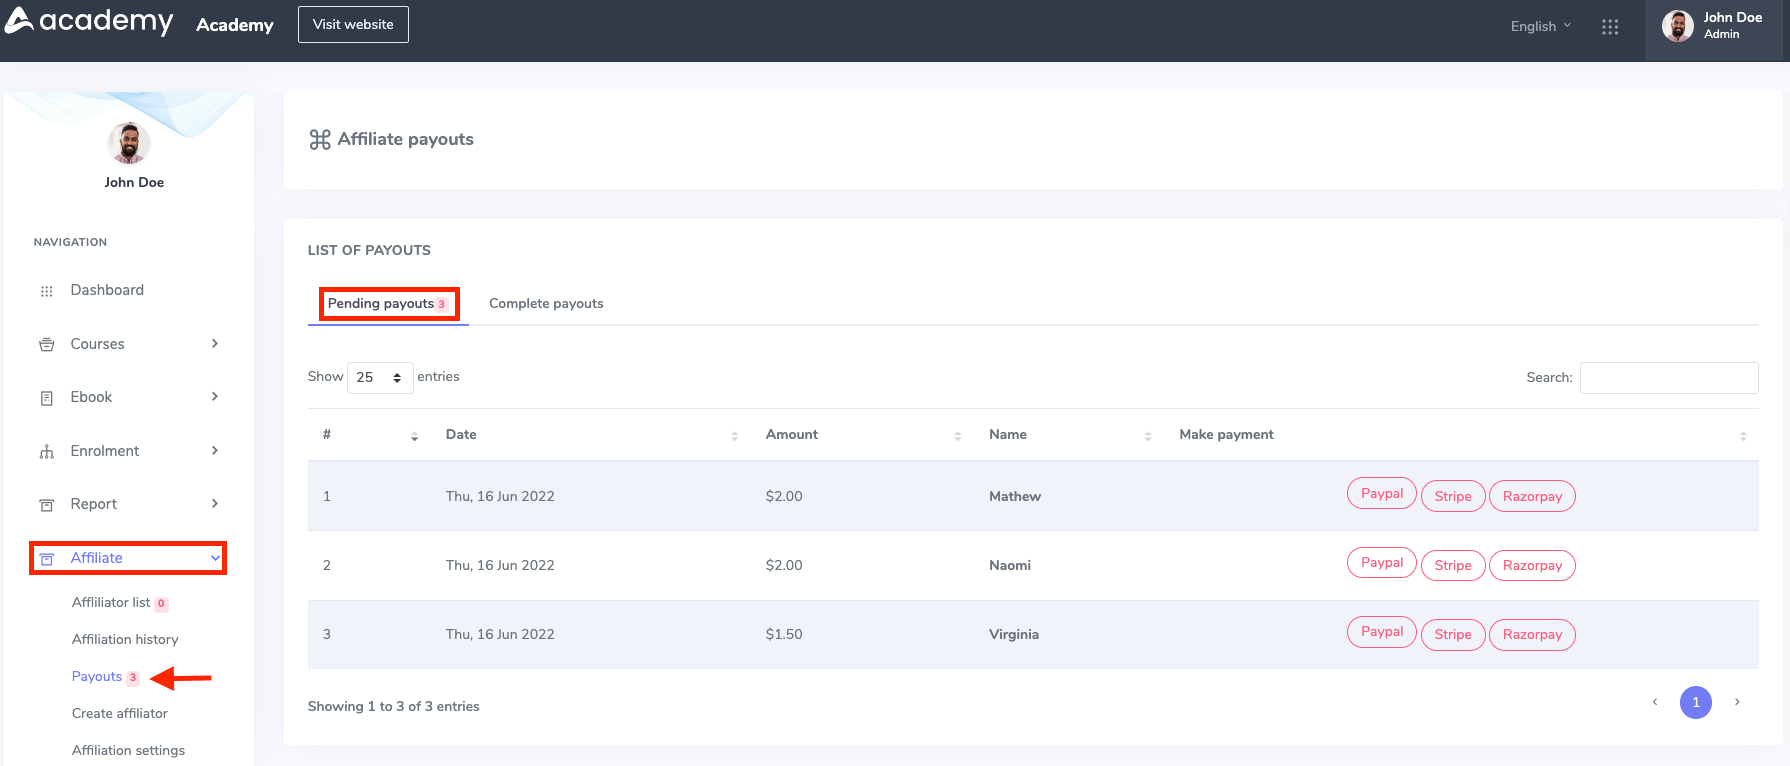
Note: The admin can not complete the payment if the gateway seems “Red.” It means the affiliator didn’t have the proper information about that gateway. The admin can complete the payment when the gateway seems “Blue.”
If you accept the pending payout it will move to the “Complete payouts” option as the complete payout’s history.

How to add an affiliator manually:
To add an affiliator, You can follow the steps below:
- Log in to the application as an admin.
- Select the “Affiliate” option from the left menu.
- Click on the “Create affiliator” option from the sub-menu.
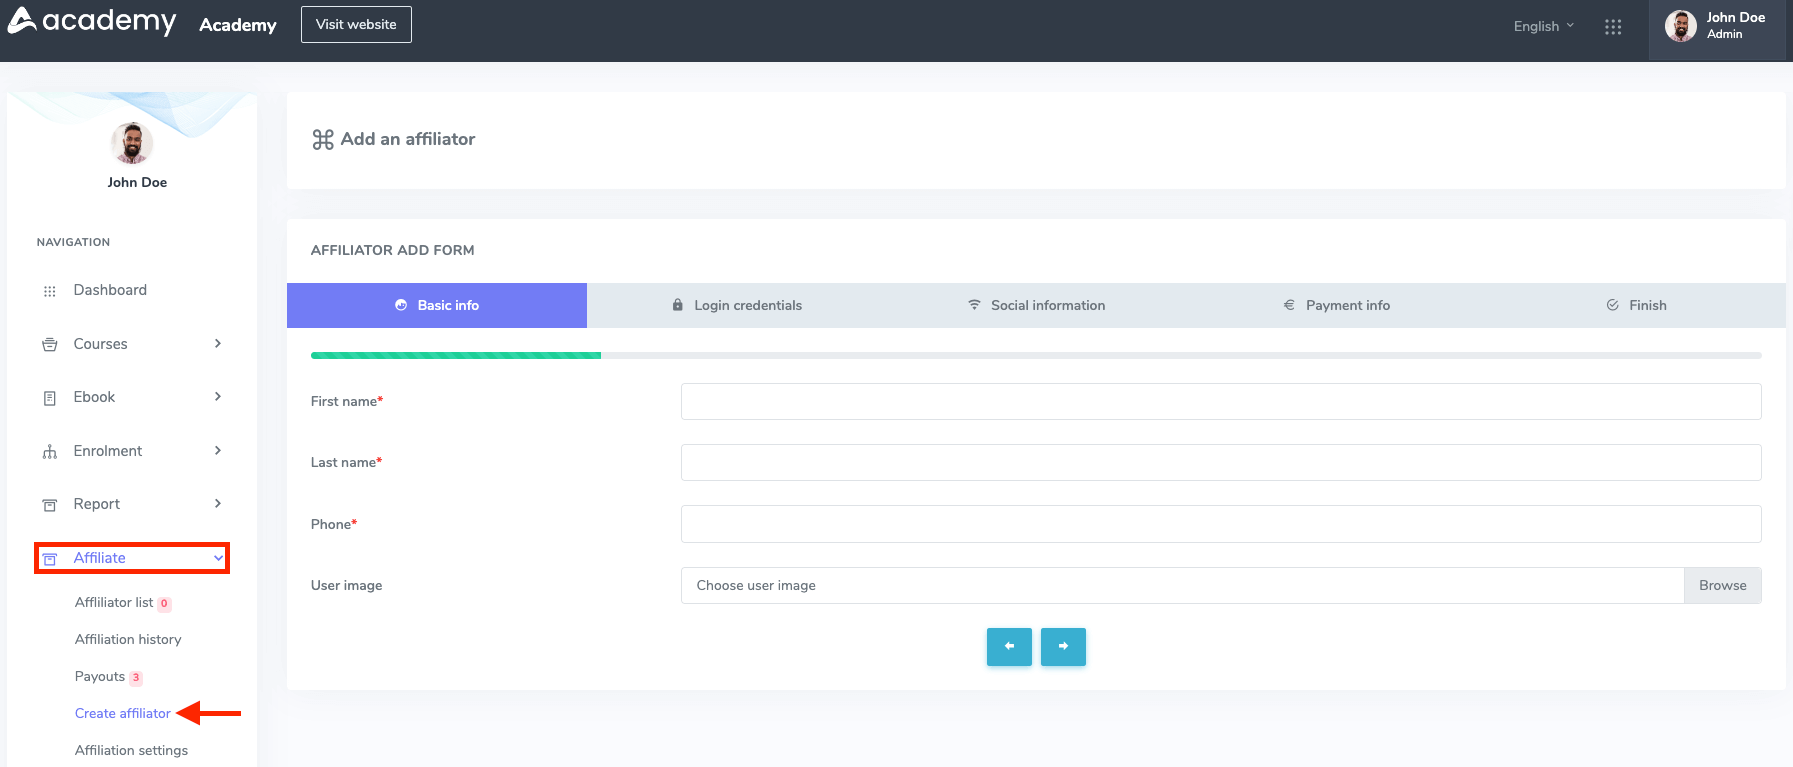
Now, you have to provide details in the “Affiliator add form.” For this, you have to complete:
Basic info:
In this form, you have to provide the basic info about affiliator.
- Provide the affiliator’s first and last name.
- Add phone number.
- Upload the affiliator’s image from the device.
- Select the “->” button for the next form.

Login credential:
Provide your affiliator’s account email in this form and select the “->” button for the next form.

Note: If you provide a new email that didn’t exist in your application data it will become a new user in your application and an affiliator. If the affiliator already exists in the application, the affiliator will get a confirmation email. Or if the affiliator is new to the application, he will get a login credential through the email.
Social information:
In this form, you have to add social media information about the affiliator. You have to provide:
- Facebook account link.
- Twitter account link.
- Linkedin account link.
- Select the “->” button for the next form.

Payment info:
In this form, you have to add the details about the online payment gateways of your affiliators. You have to provide:
- Paypal’s client ID and secret key (If you have one)
- Strip’s public and secret key (If you have one)
- Razorpay’s key ID and secret key (If you have one)
- Select the “->” button for the next form.
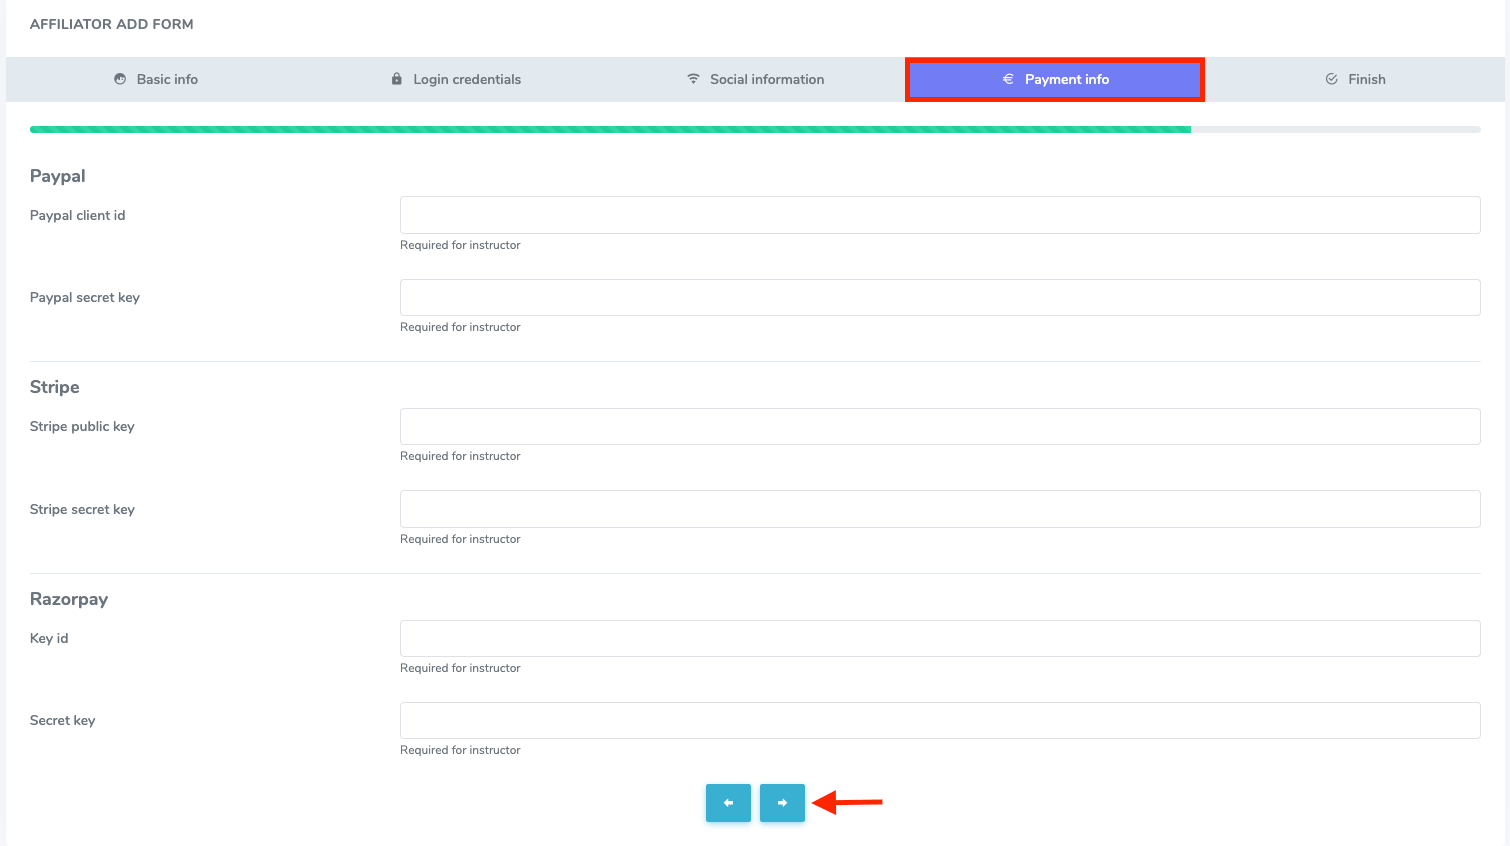
Note: If you add other payment methods, you can easily configure the payment info.
Select the “Submit” button from the “Finish” option.

How to configure the Affiliation settings:
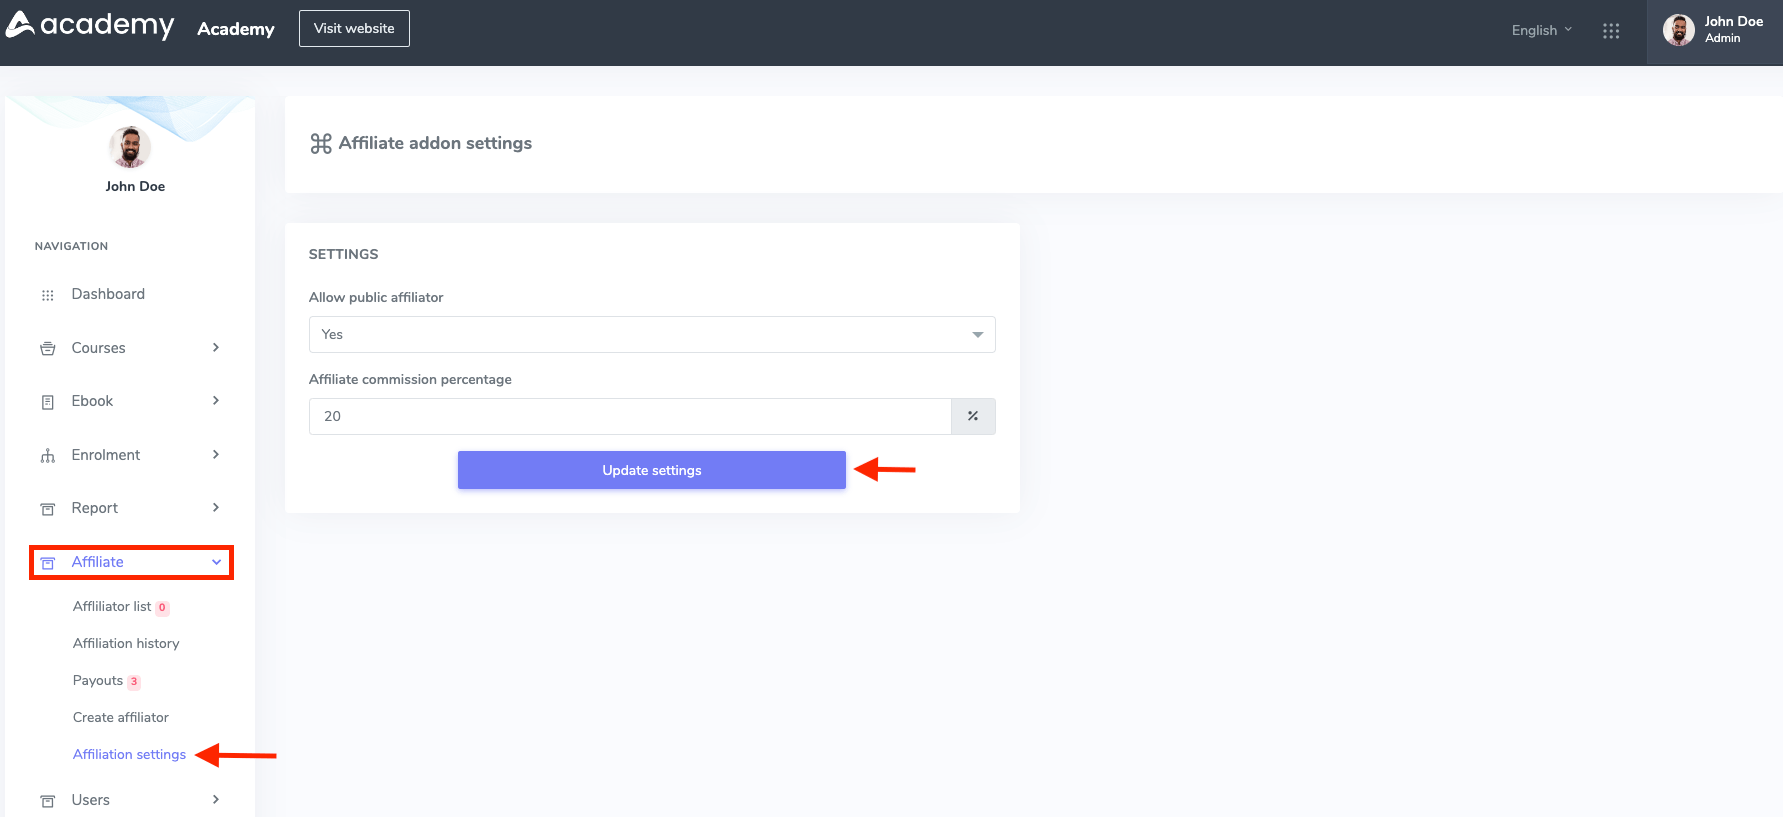
The admin can allow/disallow the public affiliation. If the admin selects the “Yes” button on the “Allow public affiliator” option it means, every user in the application can apply for becoming an affiliator. Or, if the admin selects the “No” button from the “Allow public affiliator” option it means, that only the admin can appoint an affiliator from the existing users or create a new user as well as an affiliator in Academy LMS. The admin can set the affiate commission percentage from this settings option. This commission percentage is applied to all existing affiliator in the application.
To configure the settings, you can follow the steps below:
- Log in to the application as an admin.
- Select the “Affiliate” option from the left menu.
- Click on the “Affiliation settings” option from the sub-menu.
- Allow/Disallow the public affiliator.
- Set the affiliate commission percentage.
- Click on the “Update settings” button to save your update.
How the User/Affiliator manages the Academy LMS Affiliate Addon:
In Academy LMS a user can request for becoming an affiliator if the public affiliators are allowed by the admin. A user can become an affiliator by getting approval from the admin. After becoming an affiliator, the affiliators can generate links for promoting courses. If any student purchases the courses through that links, the affiliator will get a commission. The affilator can overview their revenue history, and they can make requests for their revenue withdrawal. They can also export CSV and PDF files of their earning and withdrawal history.
To apply for becoming an affiliator, a user can follow the steps below:
- Log in to the application as a user.
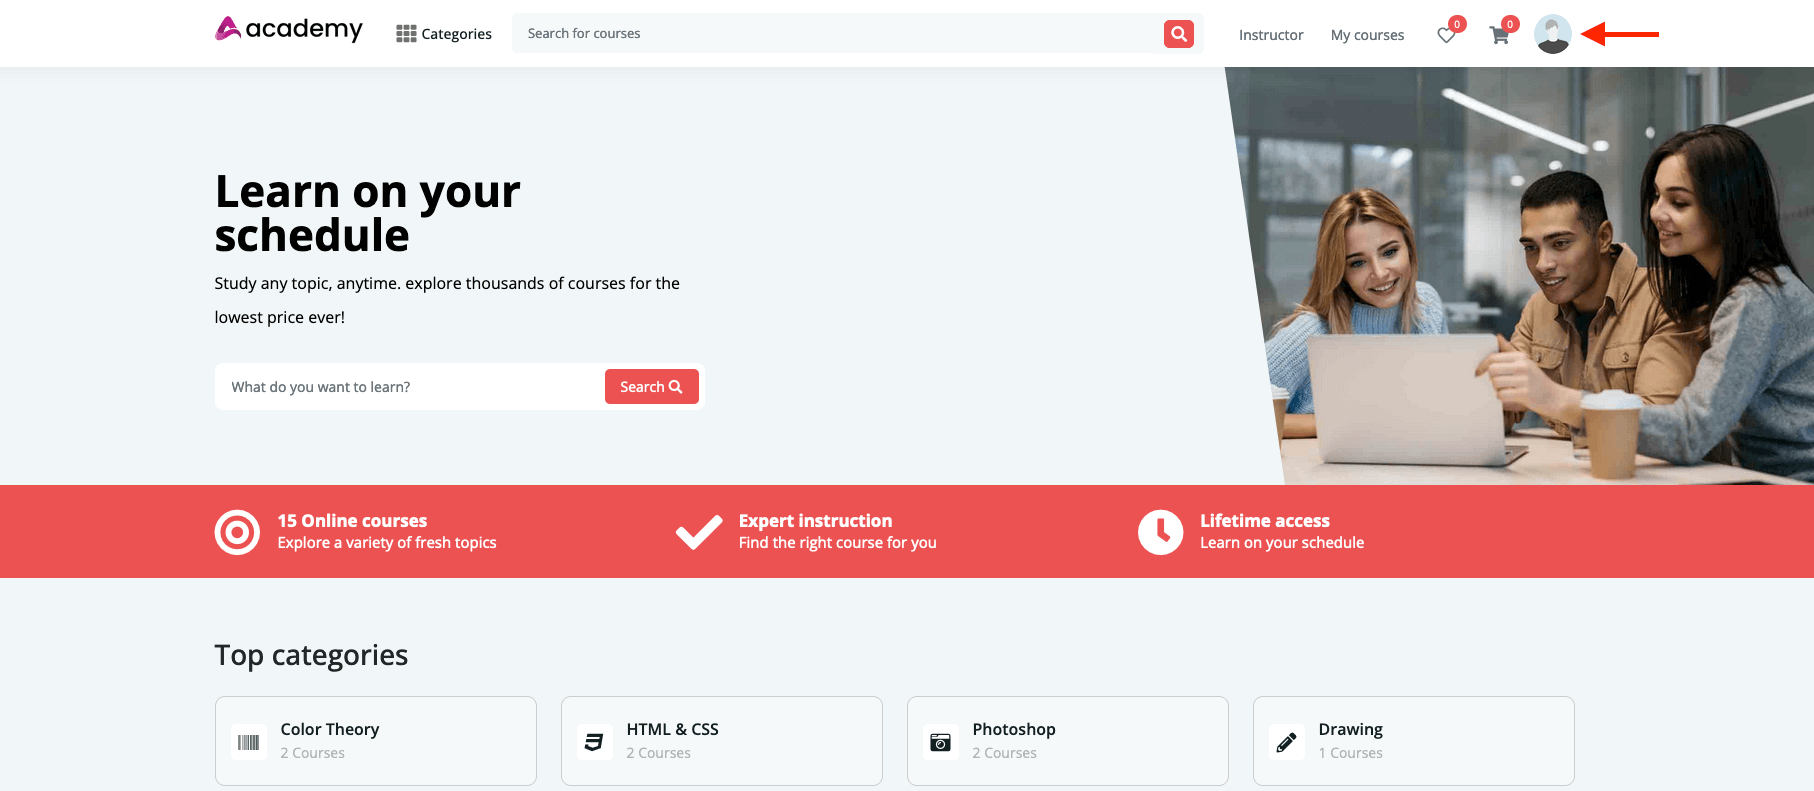
- Navigate to the home page of the application.
- Select the profile icon.
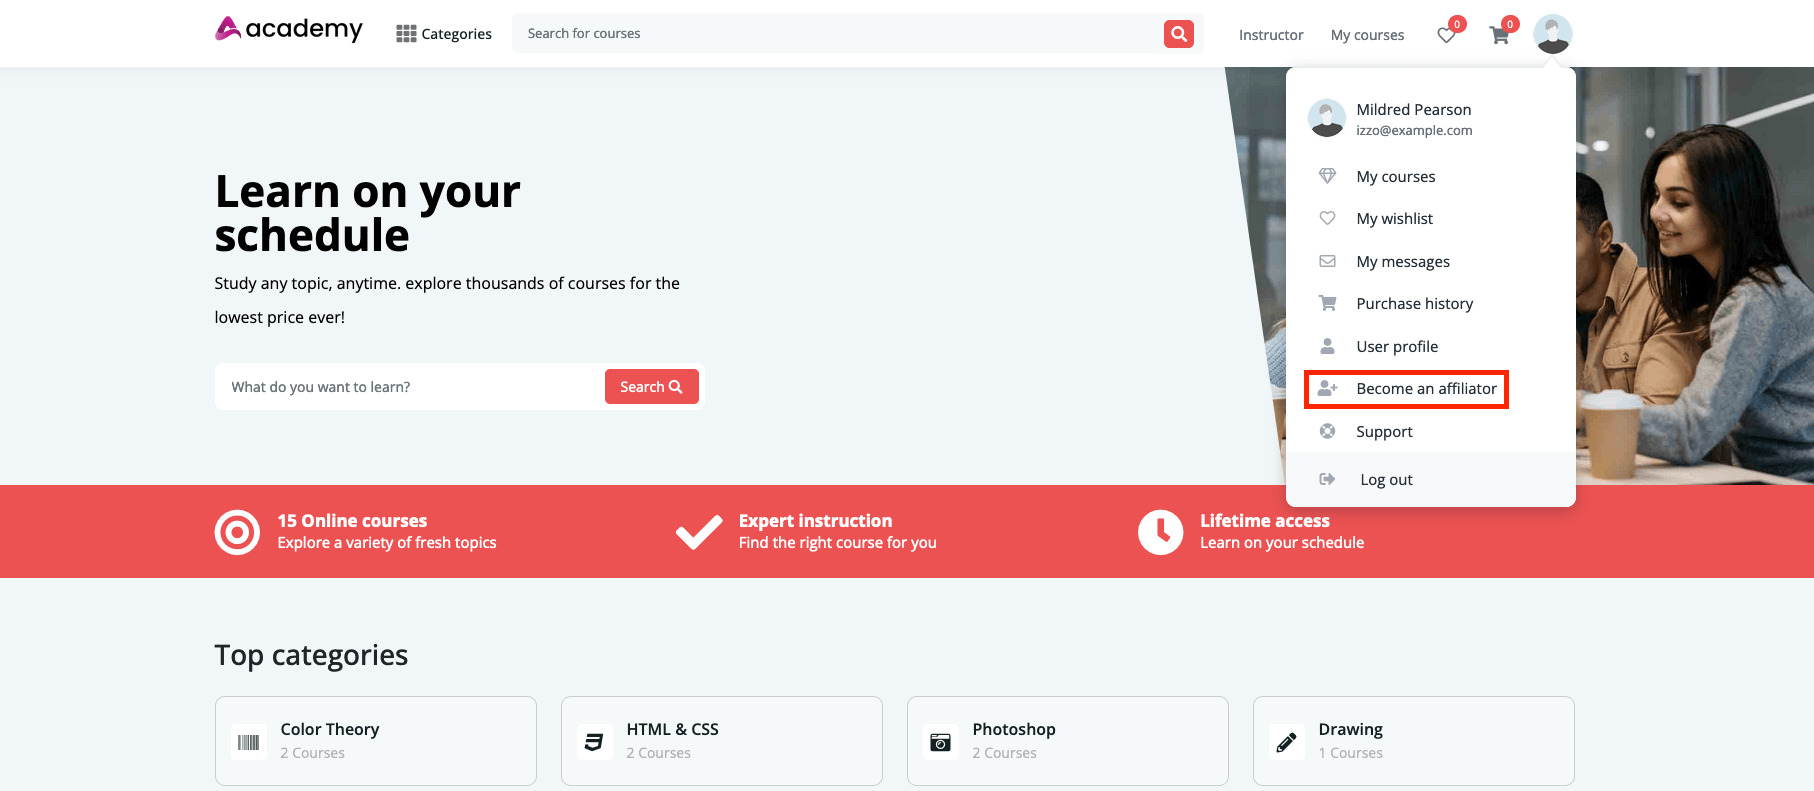
- Click on the “Became an affiliator” option.
Now you have to complete the “AFFILIATOR APPLICATION FORM.” For this, the user has to provide:
- Provide the address.
- Add the phone number.
- Write down any message. (If the affiliator wants to share any note/message with the site admin)
- Upload any documents. (If the affiliator wants to share any documents with the site admin)
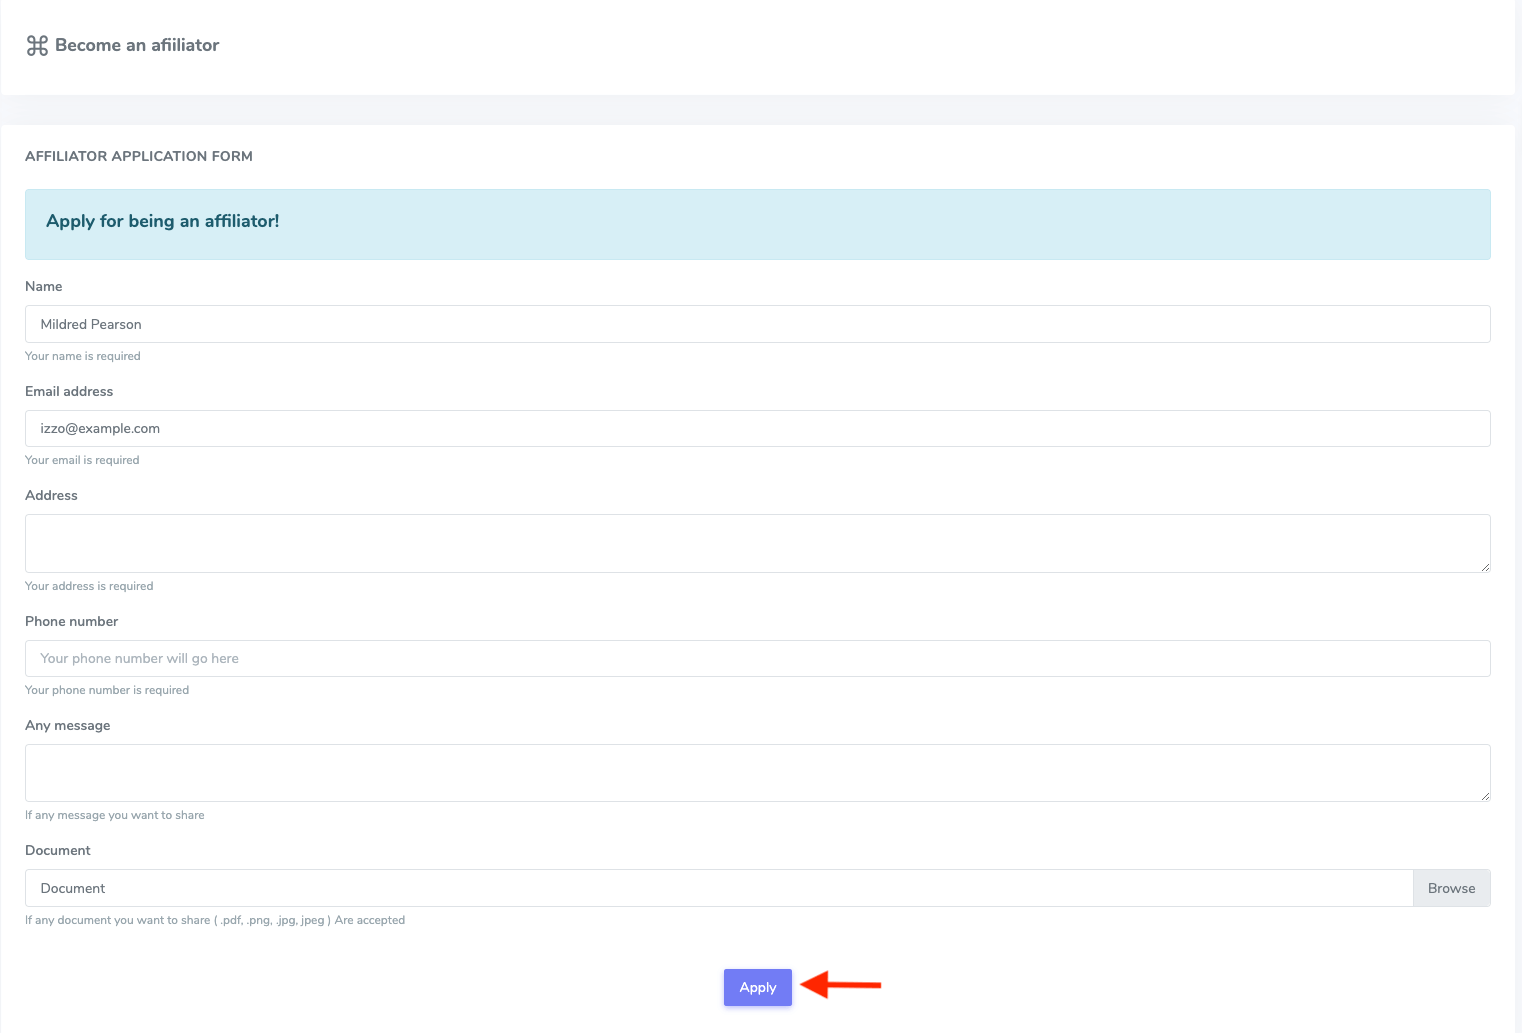
Note: The user can share PDF, JPG, and PNG files.
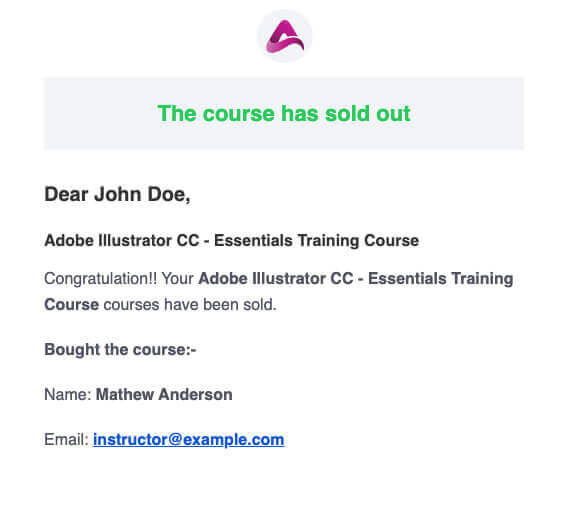
The user will get a confirmation email if the site admin approves the user’s request for being an affiliator.

After becoming an affiliator, the user can generate links for promoting courses, overview revenue history, make withdrawal requests, and export CSV and PDF files of their earning and withdrawal history.
How to get Refer link:
To get a link for affiliate marketing, the user can follow the steps below:
- Log in to the application as a user. (The user has to be an affiliator)
- Select and open a course.
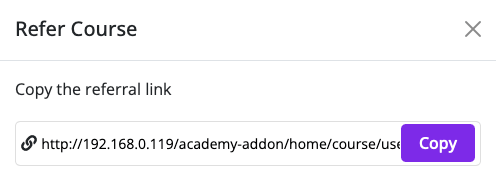
- Click on the “Share and earn” button from the course.

- Copy and use the link. (The affiliators can share this link for affiliate marketing)
How to make a Withdrawal request:
To withdraw a request, the affiliator must have revenue on the site. The affiliator can not withdraw more than their revenue. An affiliator can not make more than one request at a time. To make withdrawal requests an affiliator can follow the steps below:
- Log in to the application as a user. (The user has to be an affiliator)
- Navigate to the home page of the application.
- Select the profile icon.

- Click on the “Affiliation history” option.
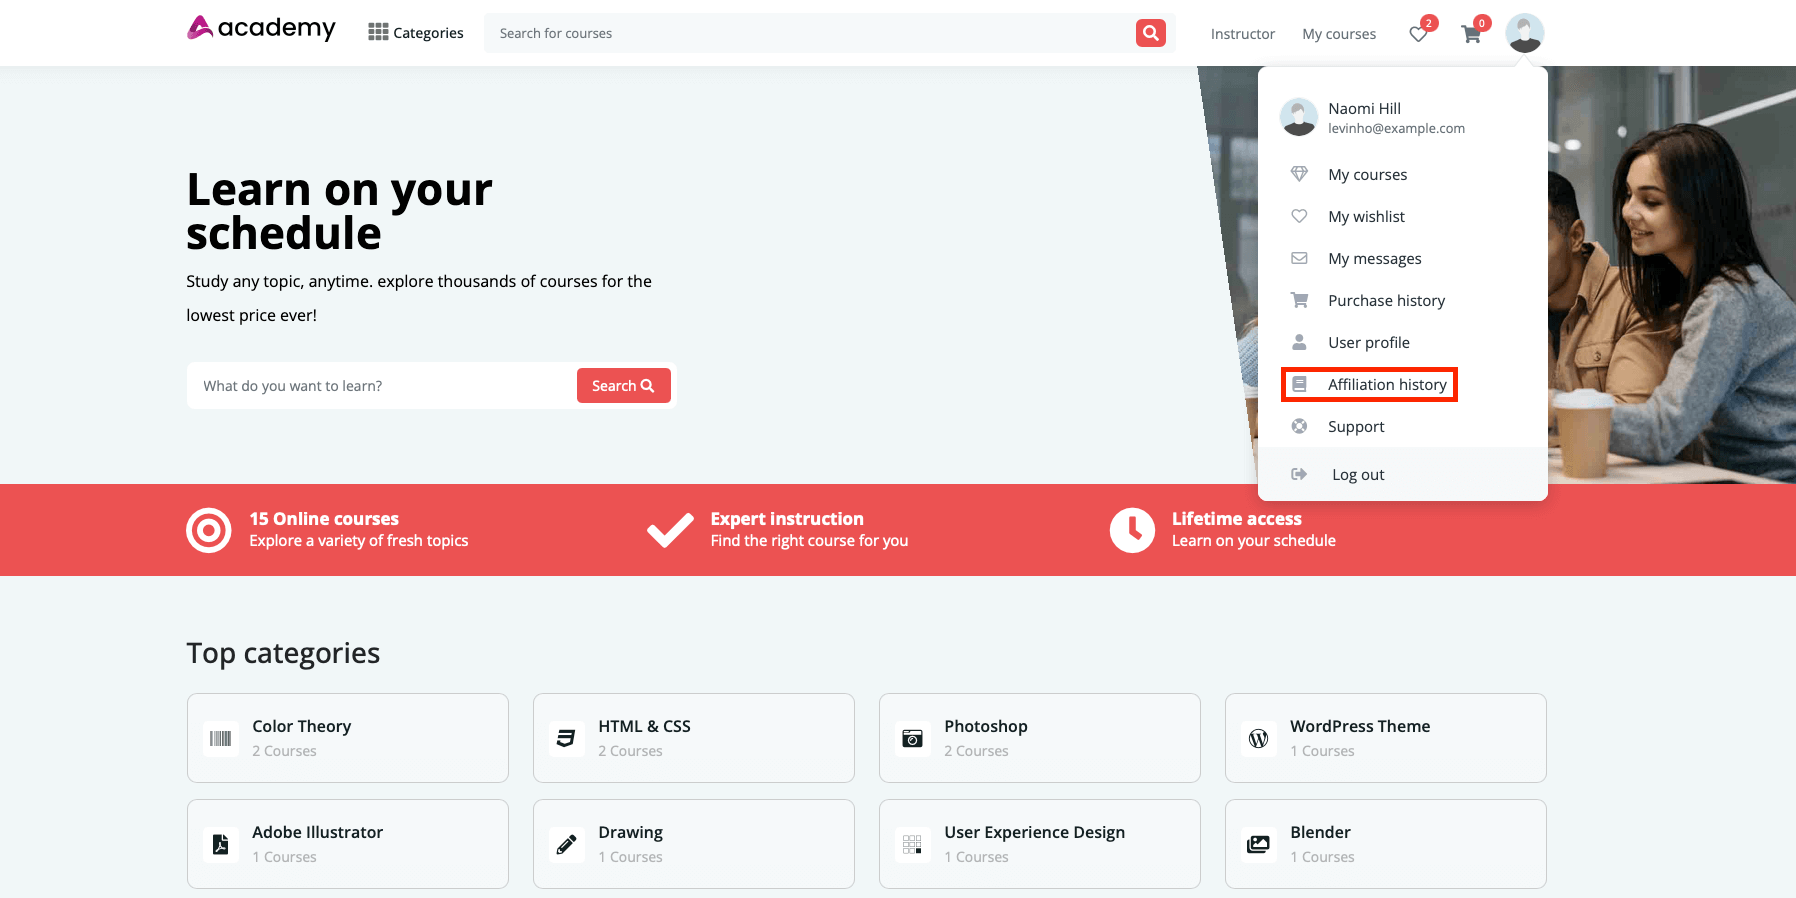
- Select the “Request a withdrawal” button.
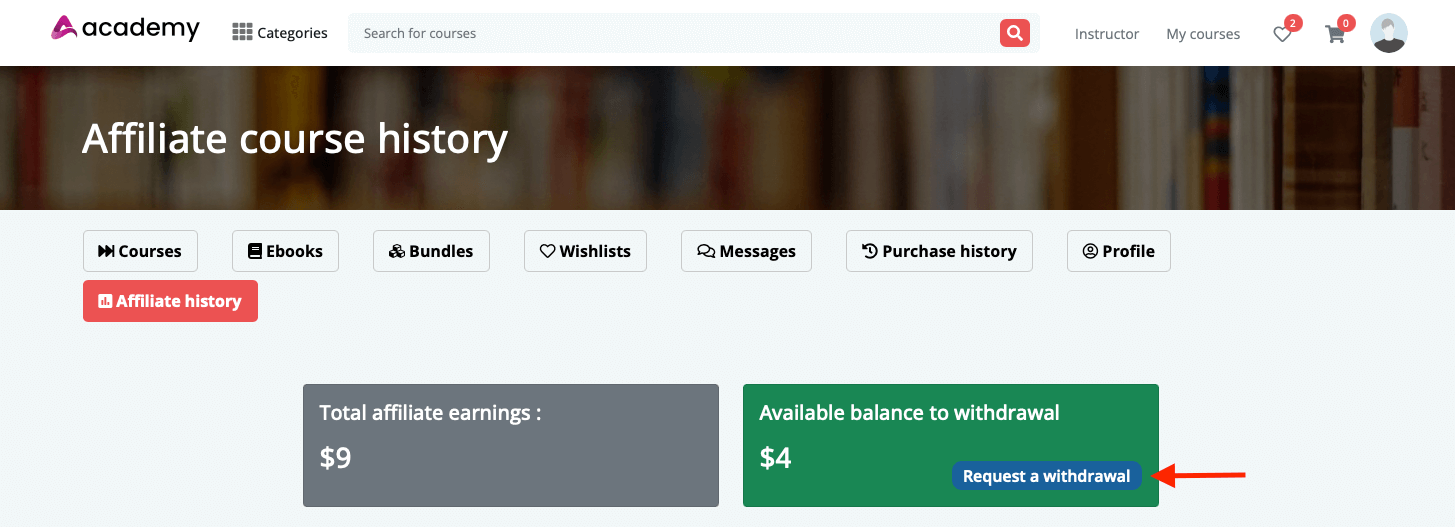
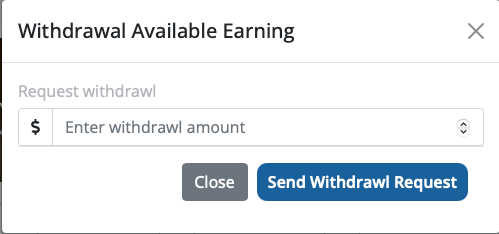
- Provide withdrawal amount.
- Click on the “Send Withdrawl Request” button to send the request.
What is Affiliate earning & withdrawal history:
An affiliator can overview their total revenue earnings, current balance, and revenue history. They can also export CSV and PDF files of their earning and withdrawal history.
An affiliator can see earning date, course name, the actual amount of that course, the commission of the affiliator, note (in this table, an affiliator can see if the course has any discount or not), commission percentage of the affiliators, and name of that person who bought the course.
In the withdrawal history, an affiliator can see the details of their withdrawal. they can see the withdrawal request date, amount, and status. If the site admin accepts or pays the commissions the status will be “Paid.” Or if the site admin didn’t pay the commissions the status will be “Paid.” The affiliators can delete the withdrawal request by clicking on the “X” button.
To export a file, an affiliator can simply click on the “CSV” or “PDF” button.
An affiliator can follow the steps below to see the earnings & withdrawal history:
- Log in to the application as a user. (The user has to be an affiliator)
- Navigate to the home page of the application.
- Select the profile icon.

- Click on the “Affiliation history” option.

How affiliate link works:
If a student clicks on the affiliate link and purchases any courses, the affiliator who provides the link to that student will get the commissions automatically. The affiliator can see their commissions in the “Affiliate Earning History” option.
How affiliate commission works:
In Academy LMS, the affiliate commission works systematically. If a course is sold in the affiliate marketing method, the affiliator will get their commissions first. Then the site admin and course creator will share their revenues.
To understand the affiliate commission sharing system, let’s see some examples.
Admin & Affiliator
Example-1:
The site admin has created the course and this course is sold in the affiliate marketing method. The site admin has set 10% as the Affiliate commission percentage in the “Affiliation setting.” The course price is $50.
10% of $50 is $5. So, The affiliator will get $5 as commission and the site admin will get $45.
Example -2:
The site admin has created the course and this course is sold in the affiliate marketing method. The site admin has set 10% as the Affiliate commission percentage in the “Affiliation setting.” The course price is $50. Also, this course has 10% discount for students.
The current value of the course is $45. Because this course has 10% discount. 10% of $50 is $5. (So $5 will be minus from the course)
Now, pay the affiliators commissions. You have to calculate the commissions based on the after-discounted price. So the after-discounted price is $45 and the affiliators commission is:
10% of $45 is $4.5. So, The affiliator will get $4.5 as commission, and the site admin will get $40.5.
Admin, Affiliator, and Course Instructor:
Example-3:
The course instructor has created the course and this course is sold in the affiliate marketing method. The site admin has set 10% as the Affiliate commission percentage. The site admin has set 70% as the Instructor revenue percentage. 30% as Admin revenue percentage. The course price is $50.
You have to pay your affiliator first from the total revenue. After that, the admin and the course instructor will get their revenue percentage based on their settings.
The affiliators commission: 10% of $50 is $5. So The affiliator will get $5 as commission.
The admin and the course instructor will get their revenue after providing the affiliators commissions. So the revenue will share based on $45. ($50 is total revenue and $5 is affiliators commission. So current revenue is $50-$5=$45)
The course instructor’s revenue: 70% of $45 is $31.5. The course instructor will get $31.5 as course selling revenue.
The site admin revenue: 30% of $45 is $13.5. The site admin will get $13.5 as course selling revenue.
Example:4
The course instructor has created the course and this course is sold in the affiliate marketing method. The site admin has set 10% as the Affiliate commission percentage. The site admin has set 70% as the Instructor revenue percentage. 30% as Admin revenue percentage. The course price is $50. Also, this course has 10% discount for students.
The current value of the course is $45. Because this course has 10% discount. 10% of $50 is $5. (So $5 will be minus from the course)
So the current value of this course is $45.
You have to pay your affiliator first from the after-discounted price. After that, the admin and the course instructor will get their revenue percentage based on their settings.
The affiliators commission: 10% of $45 is $4.5. So The affiliator will get $4.5 as commission and the current course revenue is $45-$4.5=$40.5
The admin and the course instructor will get their revenue after providing the affiliators commissions. So the revenue will share based on $40.5. ($50 is total revenue, $5 is discount, and $4.5 is affiliators commission. So current revenue is $50-$5-$4.5=$40.5)
The course instructor’s revenue: 70% of $40.5 is $28.35. The course instructor will get $28.35 as course selling revenue.
The site admin revenue: 30% of $40.5 is $12.15. The site admin will get $12.15 as course selling revenue.
